Fuel Injector Testing and Cleaning Basics
There are only three things in life: death, taxes, and people who are afraid of new technology that changes how things have been done since “the good old days.” When it comes to getting fuel into your car, young and older adults can argue about the power advantages of different atomization methods. On the other hand, electronic fuel injection has clear advantages in emissions quality, drivability, and gas mileage. That’s why all the original equipment manufacturers got rid of carburetors long ago.
The Fuel Injector Ultrasonic Cleaning and Flow Testing Process
Step 1: The outside of the injectors is cleaned with a special detergent and checked for damage.
Step 2. Coils are checked for resistance, shorts, and current draw. A fuel injector’s solenoid (coil) can pass a resistance test but still not work when the car is under a lot of stress, like when it’s on the highway. It will check the fuel injectors’ coil windings under a fake load to see any coils’ problems.
Step 3. A wire brush is used to eliminate any loose paint or rust from metal injector bodies. With plastic injectors, this step doesn’t have to be done.
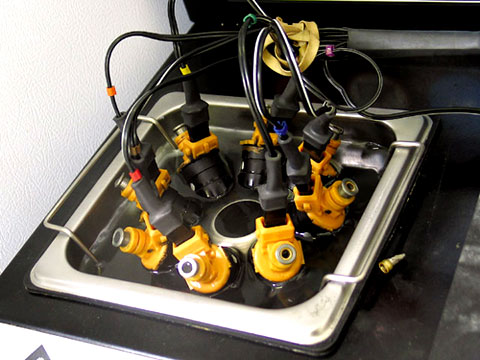
Step 4. Remove the water heater’s filter baskets, O-rings, and pintle caps.
Step 5. If there are any particles or dirt in the next step, the injectors are re-cleaned to get them out. It may be necessary to clean the fuel injectors a second time in the parts washer.
Step 6. Injectors are put into an ultrasonic cleaning tank, where they are electronically cycled on and off while being ultrasonically cleaned with special detergents and then rinsed with fresh water. This lets the ultrasonic waves agitate and break up any particles and buildup outside and inside the injectors. Cleaning fluid is pushed out of the injectors when the injectors are running. The dislodged dirt, carbon, gum, and varnish are pushed back in. This ultrasonic cleaning is done for a minimum of 30 minutes, depending on how well the injectors are in shape. Step one is to clean the fuel injectors. Step 2: Clean them again if they don’t pass the leak or flow test in Step 3.
The fuel injectors are being cleaned in the ultrasonic tank while the computerized injector drive unit turns them on and off.
Step 7. The fuel injectors are tested in the Flow Testing Bench Unit. They are tested for the following things, among other things:
- It is done at 60 to 80 psi. When the fuel injectors are closed, they should not leak any fuel.
- Spray pattern and the way fuel is spread out and atomized.
- When the fuel pressure is 43.5 psi or 3 bars, the flow rate is how much gas each injector pumps out in cc/min at that pressure. For the engine to work properly, the flow of the injectors in a set should be about 5% the same. OEM injectors are made to flow at a volume within 2% of each other.
Injectors are flow tested in two ways:
- All injectors are flow tested for 15 seconds at a certain fuel pressure of 43.5 psi, or 3 BAR. The injectors are held open at this pressure (i.e., static).
- It’s called a “Dynamic (Pulsed) Flow Test when the injectors are run for 30 seconds at different duty cycles and pulsed at different pulse widths to see how well they work. This is how it would be in the real world, with things like idling, acceleration, deceleration, low speed, and high speed. It is called pulse width when the injector is energized and held open for a certain time. Milliseconds (1000ths of a second) are used to measure this time. At 3 ms, 6 ms, and 12 ms, we test the pulse widths of the fuel injectors.
Flow testing injectors in static and dynamic simulations ensures that injectors work properly in real-world situations.
Injectors with bad flow rates or spray patterns are cleaned and re-tested to ensure they work. Injectors that don’t work after a second ultrasonic bath aren’t good or effective.
Step 8. After the flow tests are done, the results are written down on a test data evaluation sheet.
- Injectors that don’t pass leak down or flow tests are separated and marked as not serviceable or defective.
Step 9. Replace the filter baskets, O-rings, and pintle caps with new ones (if the parts are commercially available). Injectors are lubricated to make them last longer.
Step 10. The injectors are then put in a box with the old parts sent back to the owner.